lesson 11: Radiographs in Endodontics
Lesson 11: Radiographs in Endodontics
Indications for taking radiographs in Endodontics
Diagnosis
- Identifies periapical pathology, fractures
resorption, and caries.
Treatment planning
- Assesses root canal length
number of canals, and bone condition.
During treatment
- Confirms working length, and checks for errors made.
Post-Treatment Follow-Up
- Monitors healing, verifies root canal filling, and checks for recurrence of infection.
Types of radiographs in Endodontics
Intra-oral radiographs
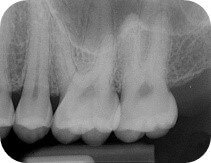
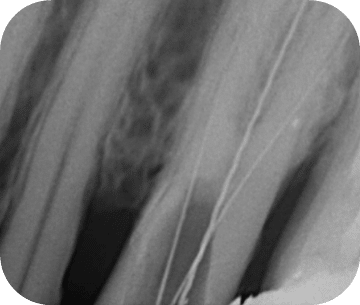
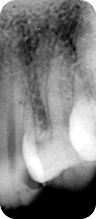
- Periapical Radiographs: Used for diagnosing periapical pathology, root canal anatomy, and bone condition.
-
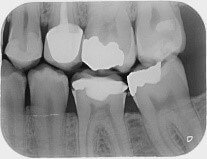
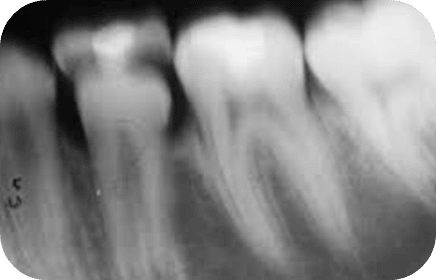
- Bitewing Radiographs: Used for interproximal caries and bone levels between adjacent teeth.
-
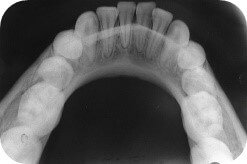
- Occlusal Radiographs: Identifies pathologies, fractures, and developmental issues in large areas.
-


Extra-oral radiographs
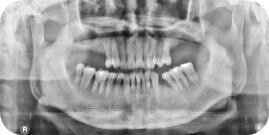
- Panoramic Radiographs (OPG/DPT): Provide a general overview of bone structures, all teeth positions, cysts, and fractures.
-
- Cone Beam CT (CBCT): Used in complex cases to examine anatomy, fractures, and pathology in 3D.

Two major techniques for periapical radiographs
- The Bisecting Angle Technique
- The Paralleling Technique
The Bisecting Angle Technique – Why Choose the Bisecting Angle?
- Ideal for Angled Teeth: When the tooth is tilted, paralleling is difficult. Bisecting compensates and still captures an acceptable image.
- Simple and Fast: Useful in emergency or time-sensitive situations.
- No Special Equipment Needed: Uses standard X-ray tools with accurate positioning.
A Step-by-Step Guide to the bisecting technique
There are 4 important steps:
Step 1: Position the Film or Sensor

Objective: Place the film or sensor inside the mouth to capture the tooth/teeth being examined.
Detailed Process
- Position the film as close as possible to the tooth without causing discomfort to reduce distortion.
- Posterior teeth: film/sensor horizontal. Anterior teeth: film/sensor vertical.
- Use bite blocks/holders when possible to improve comfort and image accuracy.
Common Challenge
- If the film/sensor is too far from the tooth, magnification and blurring increase.
Step 2: Identify the Bisector Line

Objective: Identify the bisector line (imaginary line) — the key to achieving the correct X-ray angle.
Detailed Process
- Angle: The long axis of the tooth forms an angle with the film plane.
- Bisector: Visualize the midpoint line dividing that angle into two equal parts.
- Beam direction: The X-ray beam should be perpendicular to the bisector to avoid elongation/foreshortening.
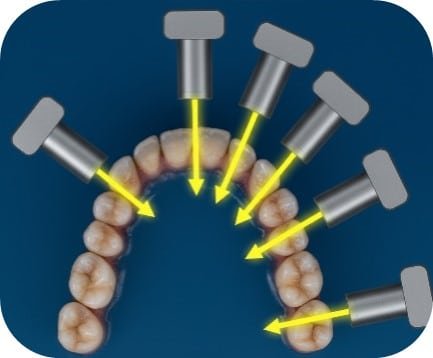
Step 3: Aim the X-ray Beam


Objective: Direct the X-ray beam perpendicular to the bisector for an accurate image.
Key Point
- Incorrect angulation leads to elongation (too long) or foreshortening (too short).
Step 4: Adjust the X-ray cone (vertical angle)
The vertical angle refers to the up-and-down direction of the beam. It helps avoid elongation or foreshortening.
Why Adjust the Vertical Angle?
- Elongation occurs if the vertical angle is too small.
- Foreshortening occurs if the vertical angle is too large.
Suggested Vertical Angles
(+ means downward direction of cone / – means upward direction)
| Tooth type | Max. Angle | Mand. Angle |
|---|---|---|
| Incisors | +40 to +50 | -15 to -25 |
| Canines | +45 to +55 | -20 to -30 |
| Premolars | +30 to +40 | -10 to -15 |
| Molars | +20 to +30 | -5 to 0 |
Common errors and how to avoid them
- Incorrect vertical angle: Causes distortion (elongation/foreshortening). Fix: use correct vertical angles.
-
- Incorrect horizontal angle: Leads to overlapping of adjacent teeth. Fix: direct central ray through contact areas.
-
-
- Patient discomfort: Film too deep causes discomfort. Fix: use bite blocks/holders and gentle positioning.
- Incorrect bisector identification: Causes distortion. Fix: practice finding the midpoint of the angle.


More errors
- Inadequate film/sensor placement: Leads to incomplete image.
- Patient movement: Leads to blurring.
-
- Overexposure/Underexposure: Image too dark or too light.

Paralleling Technique

Benefits of the Paralleling Technique
- Clear, accurate images: provides undistorted X-ray images.
- Consistency: reliable for routine radiographs.
- Reduced operator error: standardized alignment reduces human error.
Step-by-Step Guide to the paralleling technique
Step 1: Position the Film or Sensor


Objective: Place the sensor as parallel as possible to the long axis of the tooth.
- Film placement: positioned far enough to cover the tooth while remaining parallel.
- Comfort: use holders/bite blocks to stabilize.
- Orientation: posterior horizontal; anterior vertical.
Step 2: Position the X-ray Beam

Objective: Beam is perpendicular (90°) to both film and tooth.
- Use the aiming device to align the tube head correctly.
- Perpendicular alignment minimizes foreshortening/elongation.
Step 3: Patient Positioning


Objective: Ensure the patient’s head is level and steady; then take the radiograph.
↑